To install vinyl siding, strip old siding and apply house wrap. Snap a level starter line, then install starter strip, corner posts, and J-channels. Lock panels into the starter strip, maintaining 1/4-inch expansion gaps. Stagger seams, never nail tight, and finish with undersill trim under the eaves.
Replacing your home’s siding is one of the biggest exterior upgrades you’ll ever make. This guide shows you exactly how to install vinyl siding the way our Maryland pros do it. We’ve installed vinyl on hundreds of homes across Beltsville, Silver Spring, and the DMV.
What You’ll Learn
- The tools and materials needed before you start
- Our 8-step professional installation process
- How much does vinyl siding installation cost in Maryland in 2026
- Common mistakes that void manufacturer warranties
- When DIY makes sense and when it doesn’t
Why Vinyl Siding Is the Top Choice for Maryland Homes
Vinyl is the most popular siding material in the United States. It dominates Maryland neighborhoods for good reason.
It’s affordable, low-maintenance, and built to handle the Mid-Atlantic’s wild weather swings. Vinyl handles humid summers, freeze–thaw winters, and coastal storms effectively.
Compared to other materials, vinyl wins on installed price:
- Vinyl siding: $4 to $12 per square foot
- Fiber cement (Hardie board) siding: $5 to $15 per square foot
- LP SmartSide engineered wood: $6 to $13 per square foot
- Metal siding (steel or aluminum): $5 to $14 per square foot
If you’re researching how to install Hardie board siding or how to install LP SmartSide, expect a more demanding process. Vinyl is the friendliest material for first-time installers.
A professional crew can side a 2,000 sq ft home in 3–5 days. A skilled DIY homeowner should plan for 2 to 3 weekends.
Tools and Materials You Need
Before you climb a ladder, gather everything. Running to the store mid-job kills momentum and invites mistakes.
Tools
- Tape measure and chalk line
- 4-foot level
- Speed square
- Tin snips or vinyl siding cutter
- Utility knife with extra blades
- Snap-lock punch
- Nail slot punch
- Zip tool (also called an unlocking tool)
- Hammer or pneumatic siding nailer
- Circular saw with a fine-tooth plywood blade reversed for clean cuts
- Sturdy extension ladder or scaffolding
- Safety glasses and work gloves
Materials
- Vinyl siding panels (calculate square footage plus 10% for waste)
- Starter strip
- J-channel
- Outside and inside corner posts
- Utility trim and undersill trim
- Galvanized or aluminum roofing nails (1.5 to 2 inches)
- House wrap (Tyvek or equivalent)
- Foam board insulation (optional but recommended)
- Color-matched, paintable caulk
How to Install Vinyl Siding: The 8-Step Process
Here’s the exact process our installers follow on every Maryland project. These steps apply whether you’re learning how to install siding on a house from scratch or replacing damaged panels.
Step 1: Remove the Old Siding and Inspect the Wall
Strip the existing siding down to the wall sheathing. Check every square foot for rot, water damage, or pest activity.
In Maryland, we frequently find soft spots near gutters, around windows, and along the bottom row. Replace damaged plywood or OSB sheathing before moving forward.
Skipping this step is the number one reason siding fails within five years.
Step 2: Install House Wrap
Roll out a continuous layer of house wrap across the entire wall. Overlap seams by at least 6 inches and tape them with house-wrap tape.
Wrap the openings around windows and doors carefully. House wrap is your home’s primary moisture barrier.
In humid Mid-Atlantic climates, house wrap is non-negotiable. It blocks bulk water while letting interior moisture escape.
Step 3: Snap a Level Starter Line
Measure up from the lowest point of your foundation. Snap a level chalk line where the bottom of your starter strip will sit.
Most installations start at least 6–8 inches above grade. This is the most important measurement of the entire job.
If your starter line is even slightly off-level, every panel above it will tilt.
Step 4: Install Starter Strip and Corner Posts
Nail the starter strip along your chalk line. Use galvanized nails driven into the center of the slotted holes.
Leave nail heads about 1/32 inch out so the strip can move with temperature changes. Next, install your outside and inside corner posts.
Plumb each one with a level. Nail at the top of the slots first, then every 8 to 12 inches down.
Step 5: Install J-Channel Around Windows, Doors, and Roof Lines
J-channel receives the cut ends of siding panels and creates a clean, weather-tight finish.
Install J-channel around every window, door, and roof line. Cut and overlap corners so water sheds outward, never into the channel.
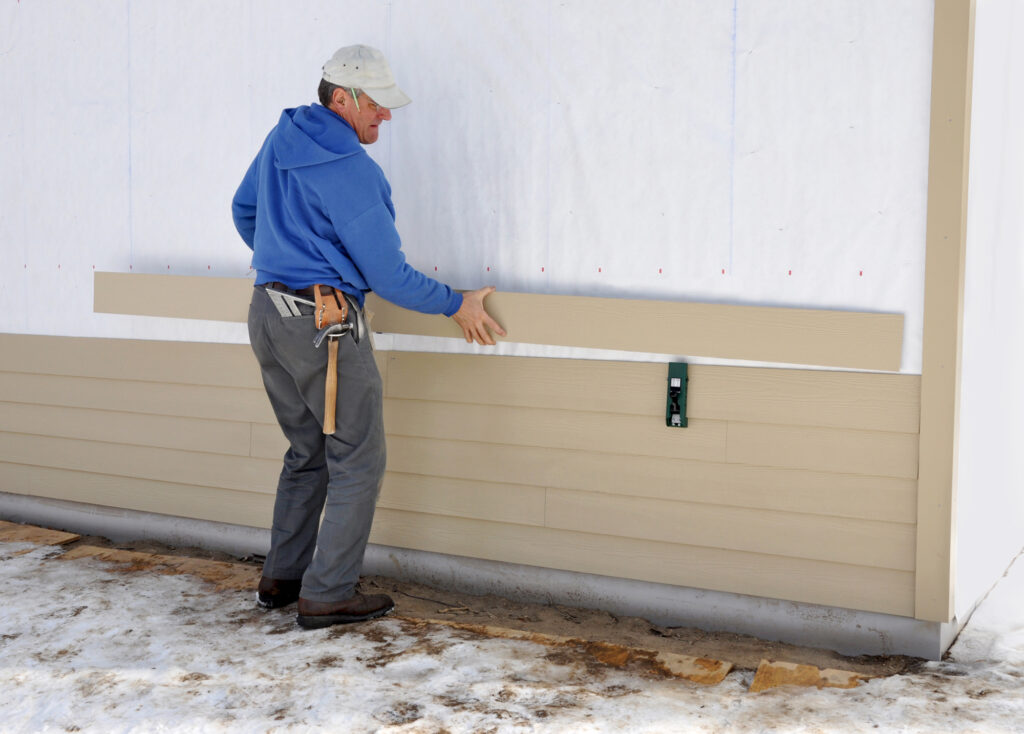
Step 6: Install the First Course of Siding

Lock the bottom edge of your first panel into the starter strip. You should feel and hear a snap.
Slide the panel about 1/4 inch away from the corner post, as vinyl expands and contracts up to 1/2 inch with temperature changes.
Critical rule: never drive nails too tightly. Vinyl needs to float. Tight nails cause buckling in summer heat.
Step 7: Continue the Courses Up the Wall
Stagger your panel seams by at least 24 inches between courses, similar to brickwork. Every panel should overlap the previous one by 1 inch.
Maintain that 1/4 inch expansion gap at every corner post and J-channel. Use your snap-lock punch on cut panels that meet the undersill trim.
Step 8: Install the Final Course and Inspect
Measure, cut, and snap-punch the final course before locking it into the undersill trim under the eaves. Walk the entire perimeter with your zip tool.
Confirm every panel is fully locked. Caulk where siding meets trim, but never caulk the bottom edge of panels. They need to drain freely.
Common Mistakes That Void Warranties
We receive calls every month to fix botched DIY siding jobs. The same five mistakes show up over and over:
- Nailing too tightly, which causes panels to buckle in summer heat
- Skipping house wrap, leading to mold and rot in 2 to 3 years
- Wrong nail type, since standard steel nails rust and stain panels
- No expansion gaps, which causes panels to crack across seasons
- Caulking the bottom edge, which traps water and rots the sheathing
If you’re researching how to install concrete siding or how to install cement siding, the rules are different. Both terms refer to fiber cement products like James Hardie.
Fiber cement requires special blades, corrosion-resistant screws, and respiratory PPE. Mixing up vinyl and fiber cement techniques is a costly mistake.
How Much Does It Cost to Install Vinyl Siding in Maryland?
If you’re searching for how much to install vinyl siding, here’s what to expect in Maryland in 2026:
Average installed cost: $4 to $12 per square foot.
Total Project Cost by Home Size
- 1,500 sq ft home: $6,000 to $18,000
- 2,000 sq ft home: $8,000 to $24,000
- 2,500 sq ft home: $10,000 to $30,000
- 3,500 sq ft home: $14,000 to $42,000
Factors That Move the Price
- Vinyl grade: builder-grade ($2 to $4) vs. premium insulated ($8 to $12)
- Home complexity: Two-story homes with dormers and gables cost more
- Old siding removal: adds $0.70 to $2.00 per square foot
- Sheathing repair: rotted plywood adds $300 to $1,000 or more
- Insulation upgrades: foam board adds $1 to $2 per square foot
- Permits: typically $100 to $400 in Maryland counties
Maryland labor rates run higher than the national average. Don’t let a low-bid contractor cut corners on house wrap, flashing, or fastener type.
When to DIY vs. Hire a Pro
DIY Vinyl Siding Installation Is Realistic If:
- Your home is a single-story ranch with simple geometry
- You have prior carpentry, roofing, or remodeling experience
- You can dedicate 2 to 3 full weekends
- You’re comfortable working from a ladder
Hire a Professional If:
- Your home is two stories or has complex angles
- You’re filing a storm damage insurance claim
- Your sheathing shows water damage or rot
- You want a full manufacturer’s warranty
Why Choose Bright View Exteriors
Bright View Exteriors is a family-operated exterior restoration company headquartered at 11720 Beltsville Drive, Suite 1030, Beltsville, MD 20705. The company is licensed in Maryland under MHIC #148746.
Our team brings 45+ years of combined experience installing siding, roofing, and gutters. We serve homeowners across Maryland, Northern Virginia, and Pennsylvania.
What Sets Our Siding Installations Apart
- Owens Corning Preferred Contractor status
- 4.9-star rating across 113+ verified Google reviews
- Free, no-pressure inspections and itemized estimates
- Insurance claim assistance for storm damage projects
- Manufacturer-certified crews (no subcontracted day labor)
- Workmanship guarantees on every installation
- Local crews who understand DMV climate and county codes
We’ve installed vinyl, fiber cement, LP SmartSide, and metal siding across Beltsville, Silver Spring, Potomac, Odenton, Brandywine, and Bowie.
Conclusion
Knowing how to install vinyl siding the right way means more than snapping panels onto a wall. It means proper preparation, the correct fasteners, real expansion gaps, and a moisture management system built for Maryland weather.
Whether you’re tackling the project yourself or comparing contractor quotes, you now know what a quality installation looks like. You also know what corner-cutting looks like.
If you’d like a free, no-obligation siding inspection, our team is happy to walk your property and provide a written estimate. No high-pressure sales. No “today-only” discounts.
Stay updated on our services and special offers. Connect with us on Facebook, Instagram, and Google My Business.
Contact us today to schedule your inspection or get a free quote.
FAQs
How long does it take to install vinyl siding on a house?
Professional vinyl siding installation takes 3 to 5 days for a 2,000 sq ft home. DIY installations typically take 2 to 3 weekends. Larger homes or complex designs can extend to 7 to 10 days. Weather delays in Maryland can add time during winter or rainy seasons.
How much does it cost to install vinyl siding in Maryland?
Vinyl siding installation in Maryland costs $4 to $12 per square foot. The total project ranges from $8,000 to $24,000 for an average 2,000 sq ft home. Premium insulated vinyl reaches $12 per square foot. Final pricing depends on home size, complexity, and old siding removal.
Can I install vinyl siding over existing siding?
Vinyl siding can sometimes be installed over wood siding, but never over old vinyl. Professional installers always remove old siding to inspect for rot, mold, or pest damage. Skipping inspection often leads to hidden moisture problems within 2 to 5 years in Maryland’s humid climate.
What tools do I need to install vinyl siding?
You need a tape measure, chalk line, 4-foot level, snap-lock punch, nail slot punch, and zip tool. You also need tin snips, a utility knife, a hammer or pneumatic nailer, and a circular saw. A sturdy ladder, safety glasses, and gloves are required for safe installation.
Should you nail vinyl siding tight to the wall?
No. Never nail vinyl siding tightly. Vinyl expands and contracts up to 1/2 inch with temperature changes. Tight nails cause panels to buckle, especially during Maryland summers. Surface temperatures can exceed 140°F on south-facing walls. Leave nail heads 1/32 inch out from the panel.